Saturday 17 June 2017

How to link Aadhaar Card to Bank Account?

link Aadhaar card to bank account

How to link Aadhaar card to Bank account?


The government has made Aadhaar card mandatory for opening a new bank account. It has also made Aadhaar card mandatory for carrying out high-value transactions. All the all existing bank accounts holders have to link their accounts with Aadhaar number by December 31, 2017, or else their bank accounts will be declared invalid.


Aadhaar Number
Aadhaar number is a 12-digit random number issued in the form of a card by the UIDAI (“Authority”) to the residents of India after satisfying the verification process laid down by the Authority. Any individual, irrespective of age and gender, who is a resident of India, may voluntarily enroll to obtain Aadhaar number. A person willing to enroll has to provide minimal demographic and biometric information during the enrollment process which is totally free of cost. Aadhaar card serves as a proof of identity as well as proof of address.

How to link Aadhaar card to Bank account?
You can link your Aadhaar card to the bank account in the following two ways:
1. Online (Using NetBanking or Mobile Banking).
2. Offline (Filling the Aadhaar to Bank Account Seeding Form)


link Aadhaar card to bank account

Online process
For linking your Aadhaar card to the bank account online, you have to follow the below steps.
1. Login to the NetBanking service of your bank. If you have not availed the net banking facility for your account, you can apply for it or you can link your Aadhaar number to your bank account through the offline process.
2. Now you need to find the option that says “View/Update Aadhaar Number” or “Aadhaar Card Seeding”. Click on it and now you will be directed to a new page.
3. Enter your Aadhaar number.
4. After entering the Aadhaar number verify the same again.
5. Click on “Submit/Update” button.
6. Now bank will verify the details and link your Aadhaar card to the bank account.
7. Bank will inform you about the same through email or SMS to your registered mobile number.


Offline process
People who do not have access to Netbanking can link their Aadhaar card to the bank account through this process.  For this process, you have to follow the below steps.
1. Go to your bank.
2. Fill the “Aadhaar to Bank Account Seeding Form”. (You can also download this form from your bank website).
3. Attach the photocopy of your Aadhaar card with this form.
4. Submit it to the bank.
5. Bank official will link your Aadhaar card to the bank account.


Many banks are offering the option of linking Aadhaar card to bank account through SMS, Phone Banking and from an ATM. You can check with your bank for availing these options to link your Aadhaar card to bank account.


You may also like to read: How to link PAN to Aadhaar?
You may also like to read: How to link Aadhaar to SBI account? 

You may also like to read: How to check if your Aadhaar is linked to your bank account?
You may also like to read: What should be the duration of the SIP?

If you liked this article, share it with your friends and colleagues through Twitter or Facebook. Your opinion matters, please share your comments.

Citibank IN CPA - Credit Card IN

Saturday 10 June 2017

How to Start a Blog on Blogger?

Blog on Blogger

How to start a blog on blogger?


Thinking of starting a blog on Bloggers.com? This post is for you. A blog is also a type of website that focuses on blog posts. Creating a blog on blogger is very simple and doesn't require any technical knowledge. You can create your blog easily and also for free. You just need a Google email address to create your own blog on Blogger.com. Follow the below instructions to start a blog using Blogger.com.


How to start a blog on blogger?
Step by step instructions to create a blog on blogger.
Step 1: Go to the blogger - https://wwwblogger.com 
Step 2: Click on the "SIGN IN" button in the top right corner of the window.
Step 3: Sign in with your Google email address and password. If you do not have a Google Account, click on "More Options" and create your Google Account.
Blog on Blogger

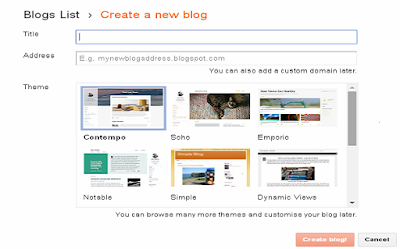
Step 4: Click on "CREATE NEW BLOG" or click the Down arrow next to "New blog" in the top left corner.
Blog on Blogger

Step 5: Enter a title (Name) for your blog in the title box.
Step 6: Choose a blog address or URL (If it is not available, try with some variations on the name you want to use but it should be related to your blog title).
Blog on Blogger

Step 7: Choose a template from the given template by clicking on one. When you select a template, it will have a blue border around it. (you can browse many more themes and customize your blog later).
Step 8: Click on "Create Blog!" button.
Congratulations - Your blog is created. Now you can start writing your posts. Write your first blog post for your new blog and join the blogging community.


How to change the name of your blog on blogger?
Step by step instructions to change the name of your blog on blogger.
Step 1: Sign in your blog on blogger.com.
Step 2: Click on "Settings > Basic" in the left menu.
Step 3: Click on "Edit" next to the "Title".
Step 4: Enter the new name for the blog.
Step 5: Click on "Save changes".
Congratulation - Now your blog has a new name.

How to write your first post of your blog on blogger?
Step by step instructions to write your first post of your blog on blogger.
Step 1: Sign in to Blogger.
Step 2: Click on "posts" in the left menu.
Blog on Blogger

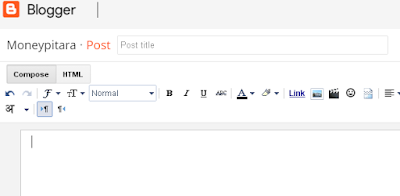
Step 3: Click on "New post" at the top of the screen.
Step 4: Write a post title.
Step 5: Write your post in the text box given below. You can use various functions like different fonts & sizes, text colour, and the facility to insert images and links. when you are done, click on "Preview" button in the upper-right corner. If you are satisfied with your post, click on "Publish" button in the upper-right window.
Congratulation once again, now you are live to your audience.


How to take backup of your all blog post?
Step by step instructions to take backup of your all blog posts on blogger.
Step 1: Sign in to Blogger.
Step 2: Go to your blogger dashboard.
Step 3: Go to "Settings > Other".
Step 4: Click on "Backup content" in the "Import & Backup" section and save to your computer.

Step 5: You will get a .xml file of the posts and comments.


How to take backup of your blog's theme?
Step by step instructions to take backup of your blog's theme on blogger.
Step 1: Sign in to Blogger.
Step 2: Go to your blogger dashboard.
Step 3: Go to "Theme"
Step 4: Click on "Backup/Restore and download theme.
Step 5: You will get an .xml file of the blog's theme.


You may also like to read: How to set your financial life in order?
You may also like to read: Ways to make extra money

If you liked this article, share it with your friends and colleagues through Twitter or Facebook. Your opinion matters, please share your comments.


Tuesday 6 June 2017

How to Link Your NPS Account with Aadhaar?

Image credit: www.india.gov.in

How to Link Your NPS Account with Aadhaar?


NPS subscribers have been advised to add/update Aadhaar number to their NPS account/PRAN (Permanent Retirement Account Number). 

National Pension System
The National Pension System is a contribution scheme launched by Indian Government. It is a defined contribution retirement savings scheme in which the contributions are invested in a mix of assets and the retirement corpus is subject to returns from those assets. Every NPS subscriber is issued a card of 12-digit unique number called Permanent Retirement Account Number (PRAN). What is NPS (national Pension System)?


Aadhaar Number
Aadhaar Number is a 12-digit random number issued in the form of a card by the UIDAI to the resident of India after satisfying the verification process laid down by the Authority. Aadhaar card serves as a proof of identity as well as proof of address.

The Pension Fund Regulatory and Development Authority, the which manages NPS, been taking various measures to simplify the procedures. For instance, the PFRDA has done away with the requirement of physical submission of registration form fro opening of a NPS account if done through Aadhaar verification and e-signature. Below is the step by step procedure to link your NPS account with Aadhaar. 

You can also read: How to Set your Financial Life in Order?


Procedure to Add/Update Aadhaar Number to NPS/PRAN online
1. Go the the website: www.cra-nsdl.com
Image credit: www.cra-nsdl.com

2. Log-in to you NPS account 
3. Click on sub menu “Update Aadhaar/Address Details” under the main menu “Update Details”
4. Select the option “Add/Update Aadhaar Number”.
5. Submit your Aadhaar Number
6. You will receive an OTP from “UIDAI” on your registered mobile number.
7. Enter OTP received from “UIDAI”.
8. After Authentication through OTP, Aadhaar will be linked to your PRAN. 

You can also read: What is Form 26AS?


Note:
1. The NPD body said that name registered against your PRAN should exactly match the name as registered with “UIDAI”.
2. A Subscriber is required to seed the Aadhaar in his / her PRAN through this process even if the Aadhaar number was provided earlier.
3. As per PFRDA, for Government Subscribers, the Aadhaar seeding process will be completed once the request initiated by a Subscriber is authorised online by his /her respective Nodal Office. 


If you liked this article, share it with your friends and colleagues through Twitter or Facebook. Your opinion matters, please share your comments.

Thursday 1 June 2017

What is Bitcoin?


What is Bitcoin?


Bitcoin is a digital currency that was created in 2009 by an unknown person Satoshi Nakamoto, whose real identity has yet to be verified.  It allows people to buy goods and services and exchange money without involving third parties like the government, bank, or a market regulator. There are no physical bitcoins, only balances kept on a public ledger in the cloud. Despite the fact that it is not a legal tender, more merchants are beginning to accept bitcoins.


How Bitcoins Work?
Bitcoins are completely virtual coins that are not tied to a bank or government and allow users to spend money anonymously. Users compete to “mine” bitcoins using computers to solve complex math puzzles. This is how bitcoins are created. Users can send bitcoins to each other using mobile apps or their computers. It is similar to sending cash digitally. The coins can be bought or sold on several marketplaces called “bitcoin exchanges” using different currencies.


Who Regulates Bitcoins?
Bitcoin itself is regulated by it’s own blockchain and the mathematics behind that. Bitcoints are completely digital and decentralized. Bicoin itself controlled by bitcoin users, rather than by a central authority like a government or a bank. There is no precious metal behind bitcoins and the value of the currency resides within the currency itself. 


Who is Using Bitcoins
Bitcoins are the largest crypto currency or digital currency. Many large businesses and companies are accepting payments in bitcoins as a legitimate source of funds. Due to media coverage the currency is becoming more and more popular with each passing day. But still many individuals and businesses won’t accept bitcoins for payments.

Advantages of Using Bitcoins
Following are the advantages of using bitcoins:

1. User Anonymity
Bitcoin transactions and purchases are discrete. Unless user voluntarily publicizes his/her bitcoin transactions, no one can trace his/her transactions back to him/her. The bitcoin address that is generated for user purchases changes with each new transaction. Even no one will be able to know how many bitcoins are there in the wallet other than the wallet owners.


2. Freedom of payment
The most publicized benefit of bitcoin is that government, banks and other third parties have no way to interrupt users bitcoin transactions or accounts. You will have complete freedom to do anything with your bitcoin money. There is no third party to intervene.

3. Mobile Payments
With bitcoins you can send and receive money to and from any part of the world. Like other online payment systems, bitcoin users can pay for their coins anywhere they have access to internet facility.

4. Cannot be Stolen
There are no physical bitcoins. Bitcoins are lines of computer code that are digitally signed each time they travel from one user’s account to the next. Bitcoins could not be stolen unless someone have physical access to a user’s computer, and then send the bitcoins to some other account.


5. No Taxes
Since there is no way for a third party to intercept or track bitcoin transactions, therefore there is no way to implement a taxation system for bitcoin transactions or purchases.

6. Low Transaction Costs
Since bitcoin transactions have no government, bank and other third parties involvement, the costs of transacting are kept very low. 


Also read: How to Set Your Financial Life in Order?
Also read: What is Mutual Funds? Benefits of Mutual Funds

Also read: 7 habits that can make you rich
Also read: Small business ideas with low investment

If you liked this article, share it with your friends and colleagues through Twitter or Facebook. Your opinion matters, please share your comments.